

Photography is all about light – by definition! How we ‘read’ the light in any scene or subject is one of the most important steps in taking a photograph. As always, the first consideration should be, “What is my intention with this photograph?” Reading the light and then setting exposure in the way you want are necessary and vital steps in realising that intention.
Reading the Light
Light has a variety of characteristics which I always consider before thinking of the more practical tasks of camera settings. Reading the light gives me the information needed to set the camera’s exposure so that I can successfully capture the image I am intending to capture.
Direction, quality and colour are characteristics of light which clearly have a considerable impact on the aesthetic value of any images. They do not, however, have a direct effect where setting exposure is concerned. They remain reasonably constant in terms of exposure once the camera position and angle have been decided.
The characteristics of light I need to consider for exposure are the amount of light and the dynamic range of any subject.
Amount of Light
This is rather obvious and can range from a subject which is very brightly lit to a scene which is almost dark. Photographers tend to be exercised by low light but ANY amount of light comes with its own challenges. This is especially true when a subject is unevenly lit and includes very bright and very dark areas.
Dynamic Range
Simply expressed, the dynamic range is the difference between the darkest part of the subject and the lightest.
Where there are lots of shadow areas AND lots of bright areas then the subject has a high dynamic range. Setting exposure in this situation is difficult and will depend on a camera’s ability to record the whole scene without under or over exposure. The example shown on the right is a landscape where there is a bright sky and much darker land.
A low dynamic range is where the majority of tones in the subject are predominantly similar. This is much simpler and most cameras will record an entire subject without losing detail in highlights or shadows. The example is a shot of a building on a dull day where the main subject is very evenly lit.
| Taking a picture - Workflow |
|---|
| Choose a subject |
| Decide on intentions |
| Compose the shot |
| Set the focus |
| Read the light and set exposure |
| Take the picture |
This article focuses on reading the light and setting the exposure.

High dynamic range (unedited)

Low dynamic range (unedited)
Setting the Exposure
Having ‘read’ the light, the next step is to set the exposure. There is no right answer here and the ‘correct’ exposure is the one I want to represent the subject as I intend.
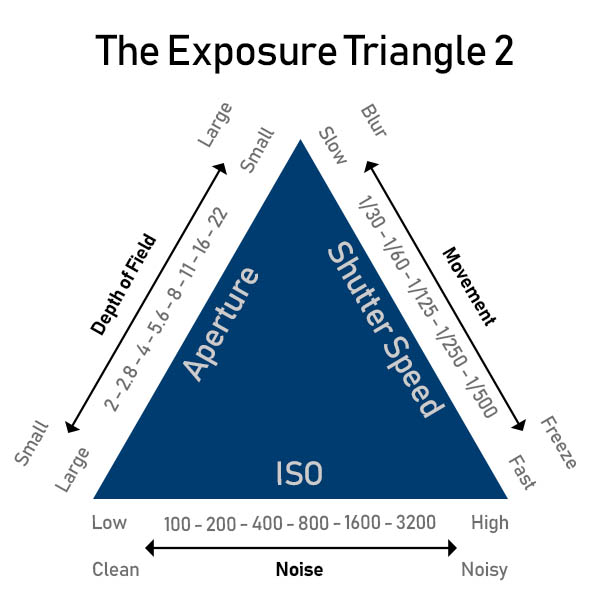
Exposure is set via a combination of aperture, shutter speed and ISO. This is often referred to as ‘The Exposure Triangle’.
- Aperture relates to the size of the hole which will open in the lens.
- Shutter speed relates to the time that hole remains open.
- ISO refers to the sensitivity of the sensor.
An understanding of the Exposure Triangle is essential to achieving the desired exposure.

Aperture and Shutter Speed
There is a direct relationship between aperture and shutter speed. Double one and I must halve the other to maintain the same exposure.
| Aperture | Shutter Speed |
|---|---|
| f2.8 | 1/1000 |
| f4 | 1/500 |
| f5.6 | 1/250 |
| f8 | 1/125 |
| f11 | 1/60 |
| f16 | 1/30 |
Each of the above combinations result in exactly the same amount of light reaching the sensor.
ISO
Similarly, ISO is entirely predictable. If I double ISO then I can either reduce the size of the aperture by one stop OR reduce the speed by one stop. Of course, if I increase ISO by more than one stop, I can distribute the extra capability between Aperture and Shutter Speed in any combination I wish.
| ISO | Aperture Mode | Shutter Speed | Aperture | Shutter Mode |
|---|---|---|---|---|
| 100 | f5.6 | 1/30 | f2.8 | 1/125 |
| 200 | f5.6 | 1/60 | f4 | 1/125 |
| 400 | f5.6 | 1/125 | f5.6 | 1/125 |
| 800 | f5.6 | 1/250 | f8 | 1/125 |
| 1600 | f5.6 | 1/500 | f11 | 1/125 |
| 3200 | f5.6 | 1/1000 | f16 | 1/125 |
In Aperture priority mode, the shutter speed will be faster as ISO is increased.
In Shutter priority mode, the aperture will be smaller as ISO is increased.
Metering modes
Most cameras will offer a choice of metering modes. Each of these will meter the light in a different way. Be aware that whichever method is used, the camera is only offering a suggestion and not a right answer. I will nearly always use Centre-Weighted Average metering which averages the light across the entire frame but gives more emphasis to the area around the centre. Occasionally I will use Spot metering which reads the light only in a small area around the centre of my frame. This is useful when I want a precise exposure for a specific element in my subject.
Exposure Compensation
I have a very cavalier attitude towards metering and will use the camera’s suggestion as a starting point. I often choose to vary this suggestion depending on how I have read the light. There are two main ways to vary the recommended exposure:
- Exposure compensation – this allows me to override the suggested setting by over or under exposing. The precise method for doing this will vary from camera to camera.
- Manual mode – aperture and/or shutter speed can be changed to over or under expose the shot. I prefer this method as I find it easier to twiddle the knobs without having to move the camera.

Bracketing
If I think that the dynamic range of my subject is more than my camera is capable of rendering, then I will bracket my shots. This means that I take a sequence of 3, 5 or more shots automatically. With 3 bracketed shots, one will be under-exposed, one will be normally exposed and one will be over-exposed. These can be blended together in post-processing. I can use HDR processing to do this automatically or I can blend layers manually in Photoshop using any one of a variety of techniques.
In the example on the right, the original shot, taken with the recommended exposure, had poor detail in highlight and shadow areas. I then took 3 bracketed shots with exposure set at -1.5 stops, 0 stops and +1.5 stops. These were merged in Lightroom using HDR merge. The merged shot was then edited in Lightroom and Photoshop.
Some will use bracketing as a form of insurance in the mistaken belief that if they take a number of shots at different exposures, one of them is bound to be OK! That may work on occasions, but if all the information needed can be recorded in a single frame, then there’s no need to bracket – just read the light and set the exposure which works! (see previewing below)
Example: Bracketing


The Tricky Bit!
Many different settings can produce the same exposure. It’s usually easy enough to select exposure settings which will expose the photograph exactly as I wish, but I also need to consider the other effects of each of the three areas of the exposure triangle:
- Aperture: do I want a small amount of my photograph to be in focus? (large aperture) Do I want most or all the photograph to be sharp? (small aperture)
- Shutter Speed: do I want to freeze the subject? (fast shutter speed) Do I want my photograph to blur any movement within the subject? (slow shutter speed)
- ISO: Do I want my photograph to be ‘clean with no noise? (low ISO) Does it matter if my photograph shows some evidence of noise? (high ISO)
It’s good practice to think about the other effects of changing any of these settings before changing them.
My Approach
My usual preference (and order of doing them) is:
- Aperture: this depends entirely on the subject and how much of it I want to be sharp. I use the largest aperture I can select to achieve the effect I want as this will give more flexibility with shutter speed. There’s little point in selecting f22 if f8 will do the job!
- Shutter Speed: For general hand-held photography I will select a shutter speed which guarantees no camera shake. This is usually a minimum of 1/125 of a second. I’ll use a tripod for anything less. Where there is movement in the scene, I’ll select a shutter speed which will work best for the subject whether it is to freeze it or blur it.
- ISO – For best quality, I try to use a low ISO all the time – usually 100. I will, however, increase ISO in low light where I want a faster shutter speed and/or a smaller aperture.
NOTE: Using a tripod gives much more control over which specific settings I use. With a tripod I don’t need to compromise aperture at the expense of a fast shutter speed. A tripod is essential for longer exposure times which are needed to blur movement.
Taking the Picture
Then I’ll take the shot. Nearly always, I’ll preview the shot to check and check the histogram to see if the exposure is what I expected. If it isn’t, I’ll adjust and take the shot again. This is a much better approach than bracketing and hoping for the best!
Post-Processing
This is an extension of picture taking where I have set out to capture the information I’ll need to create the image I intended to make. I will already have an idea in my mind of what will need to be done in post-processing when I am taking a photograph. In most cases I use Lightroom for lens correction, cropping, transforming and adjusting tone and colour. I use Photoshop (often with Color Efex Pro or Silver Efex Pro) for everything else.
